What Is Greenware In Pottery & Ceramics?
Have you heard of the term “greenware”?
It refers to clay that’s been molded into the shape you want, but it hasn’t been fired in a kiln yet.
The clay goes through 3 stages before it’s ready to be fired, starting as soft and pliable, then becoming firm but still workable (leather hard), and finally becoming completely dry (bone dry).
When the clay has been fired, it transforms into beautiful ceramic ware and is no longer considered greenware.
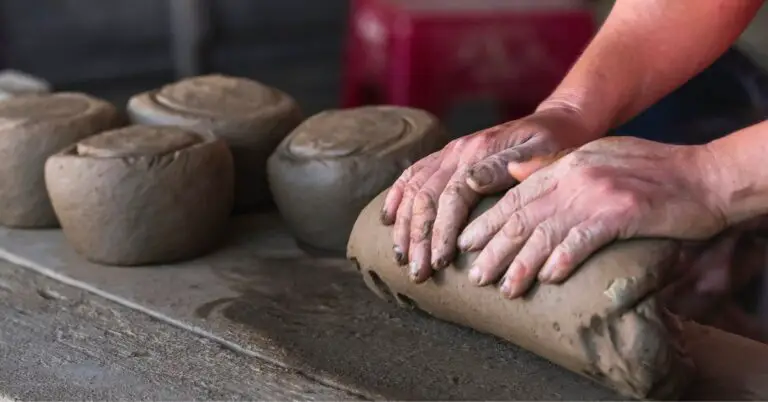
Stages of greenware
Once you’ve shaped your clay into a beautiful creation, it’s time to let it dry before firing. This drying process is actually referred to as “greenware”.
It’s just a term to describe the different stages of drying that happen after you’ve shaped your pottery.
Let’s look at the three different stages of greenware!
Stage 1 – plastic clay
When your clay is at this stage, it’s still nice and moist, which makes it soft and pliable. This is because there’s still water within the clay particles and between them, allowing the particles to move smoothly and allowing you to shape the clay however you want.
It’s also known as “plastic” or “workable” clay at this stage because it’s so easy to work with. You can pinch, roll, and bend it without any cracks, and if you do notice a few cracks starting to form, no worries! You can easily smooth them out with your thumb or a modeling tool.
Stage 2 – leather hard clay
As soon as you take your clay out of its plastic bag, it begins to lose moisture and stiffen up. It’s a gradual process, but eventually, it will reach the “leather hard” stage, which is still considered greenware. This stage has three phases of its own!
- Soft Leather Hard Clay: At this stage, you can still bend and flex the clay a bit, and if you pinch it, it will still change shape. But it’s a lot stiffer than the previous plastic stage, making it easier to handle without losing its shape.
- Stiff Leather Hard Clay: This stage is also known as the “hard cheese” stage. The clay still has some moisture and flexibility, so you can carve into it and join pieces of clay using slip.
- Dry Leather Hard Clay: At this stage, the clay is pretty hard and can easily break if you try to bend it. It’s also lighter in color and a bit crumbly when you carve into it or trim it. Joining pieces of clay at this stage can be tricky as the moisture is quickly absorbed from the slip, causing it to dry out and not bond the two pieces together.
Stage 3 – bone dry clay
When the clay has lost as much moisture as it can, it becomes bone dry. This is important because the clay needs to be bone dry before it’s fired in a kiln.
You see, greenware clay contains two types of water. One is called mechanical water, which sits between the clay particles, and the other is chemical water, which is bonded to the clay particles. As the clay dries, the mechanical water migrates to the surface and evaporates. However, the chemical water can only be driven out during the firing process.
It’s crucial that all the moisture is removed from the clay before it’s fired, because any remaining moisture will turn into steam at 212°F (100°C) and cause the clay to crack or even explode.
How to dry your clay
It’s important to know that as clay dries, it can shrink and change shape, leading to warping or cracking in your pottery. This is because different parts of the pottery dry at different rates, with edges and fine details like handles drying faster and shrinking faster.
But don’t worry, there are ways to avoid these issues! Here are a few tips to keep in mind:
- Dry your pottery slowly by keeping it loosely covered
- Avoid exposing it to direct sunlight or drafty areas
- Turn your pottery upside down as soon as it can be handled
- Cover handles and fine details with plastic
- Transfer your pottery onto a grid or rack for air circulation
- If drying large flat slabs like tiles, start with them sandwiched between two boards
Have to slow down. I’m out of space for greenware. This is what comes of ~45 min a day for 2 or 3 months😬 pic.twitter.com/xKxx8iAflZ
— Robert Mahon (@RobertCMahon) July 8, 2020
How long should greenware dry?
Drying is a crucial part of making pottery and it can also be the most boring part.
But don’t worry, we’ve got this!
Just remember to let your greenware dry to the touch before moving on to the next stage. It could take a few hours or even a few days, so be patient.
One thing to keep in mind during drying is that the clay consists of a lot of water, typically 20%. As the pottery dries, it will shrink, and if one part dries quicker than the other, it could cause stress and lead to cracking.
But don’t worry, we can prevent this by spraying some water on the fast-drying areas with a spray bottle. This will ensure an even drying process. You could also try draping plastic bags over the pieces to prevent air currents from drying one side faster than the other.
Remember, the internal layers of the pottery will dry slower than the surface exposed to air, so keep this in mind when drying. But with a little care and patience, we’ll get through this stage and have some beautiful pottery to show for it!
How to handle unfired clay
When clay is still pliable and soft, it’s important to handle it gently to prevent it from losing its shape. But don’t worry if that happens! You can reshape the clay while it’s still plastic.
However, once the clay becomes bone dry, it becomes extremely fragile and can easily break or chip if handled carelessly. To keep your greenware safe, try to minimize the amount of movement it goes through and be extra cautious when handling it.
Repairing cracks in greenware
If you find out that your greenware pottery has suffered a crack, it’s worth trying to mend it if you can!
It’s much easier to repair a crack in greenware than in fired pottery.
If the crack is small and just a hairline, you can try using vinegar mixed with water to moisten the area and use a modeling tool to shape the clay around the crack. This is because vinegar can help the clay particles stick together.
However, if the crack is near a handle, it’s probably best to recycle the project, as the crack may become a weakness after the pottery is fired. Also, if the crack is larger than a hairline, it can be challenging to repair.
It’s good to know that there is a product called Magic Mender that can fix both greenware and bisque pottery, and some types of greenware clay, like Paper Clay, are easier to mend due to their added cellulose fibers.
Recycling greenware
Don’t worry if your greenware cracks or warps – it happens to the best of us! In fact, sometimes it’s through our mistakes that we learn the most. And, the best part is that greenware can be recycled, so there’s no need to waste any of your precious pottery clay.
Before clay is fired, it can be rehydrated and recycled at any time. If your greenware is dry, simply break it into smaller pieces and soak it in a bucket of water. Once it has absorbed the water, mix it up and wedge it to make it usable again.
If the recycled clay is too wet, no problem! Just place dollops of it on a plaster slab. The plaster will help to draw out excess water, making the clay less soggy. Once it’s a bit more manageable, you can wedge it and start using it again.
Decorating greenware
If you’re looking to add some extra personality to your ceramic creations, you’re in luck. Greenware ceramics is a great stage to get creative and experiment with different techniques. Here are a few options to consider:
- Acid etching – This involves applying an acidic solution to the surface of your piece to create unique patterns. You can even try it on glazed works.
- Carving or incising – This involves using sculpting tools to carve designs into your clay. Do this at the plastic or stiff leather-hard stage when the surface is still soft.
- Embossing or debossing – This involves raising or lowering patterns off the surface of your clay. It’s best to do this when the clay is at the soft leather-hard stage.
Additionally, you can try texturizing stamps, slips, engobes, or underglaze for added texture. If you want to go straight to glazing, consider skipping bisque firing and go for single firing or raw firing. There are plenty of options to choose from, so let your creativity flow!
First #firing finished; next one ready to go. Then it’s glaze, glaze, glaze. #bisque #greenware #pottery #magic ❤️ pic.twitter.com/gkfE6Uhf5i
— Melissa Ostrom (@melostrom) September 10, 2020
Bisque firing greenware
Firing greenware pottery is a great time to get creative with your kiln loading! Since your pots haven’t been glazed yet, you have the freedom to stack them in a variety of ways without worrying about them sticking together.
Just make sure you’re not putting too much weight or stress on any one piece and avoid resting the greenware against the red-hot kiln elements. With these guidelines in mind, you can fit a lot more into your bisque firing and have fun experimenting with different stacking arrangements.
Read this article if you want to know which cone you should fire your clay at.
Conclusion
I hope this post helped you to learn more about what greenware is and the three stages it goes through.
If you want to keep learning more, I recommend reading this article about the different stages of clay as well.
Frequently asked questions
Why is it called greenware?
The term “greenware” is used to refer to unfired clay. There are two suggested reasons for this name. Firstly, the word “green” implies that the clay is not yet “ripe” or ready and needs to undergo changes before it can be used. The second suggestion likens greenware to “green” wood, which is alive and contains moist sap. In the same way, clay that still holds moisture is referred to as “green” ware.
Although bone-dry clay is also considered greenware, it still holds some moisture deep within. It is recommended to start a firing schedule with a slow bisque fire to help the clay adjust to the changes it goes through during the firing process.
Can you buy greenware pottery?
Greenware pottery is often fragile, which makes it difficult for suppliers to sell. This is due to the high risk of it breaking during transportation. As a result, it is not very common to find suppliers that sell greenware pottery. Instead, suppliers usually create their own pottery and fire it before shipping it to customers, ensuring that it arrives in good condition.
What is the difference between greenware and bisqueware?
Greenware is defined as unfired pottery, while bisqueware refers to clay objects that have been fired but not glazed yet. The bisque stage allows for the addition of colors and food-friendly glazes. To prepare for this stage, the piece must be dried. After drying, a high temperature firing is required. The bisque fire makes the piece ready for decorating techniques such as glazing, painting with acrylics, or other forms of embellishment.